C27 and C32 Generator Sets Operation and Maintenance Manual Page 124
Operation and
Maintenance
Manual
124 SEBU8088-06
Maintenance Section
Winding - Test
Visually inspe
ct the water pump for leaks. If any
leaking is observed, replace the water pump seal
or the water pump assembly. Refer to the Service
Manual for the
disassembly and assembly procedure.
Note: Refer to the Service Manual or consult your
Caterpillar
dealer if any repair is needed or any
replacement is needed.
i02903565
Winding - Tes
t
SMCS Code: 4453-081; 4454-081; 4457-081;
4470-081
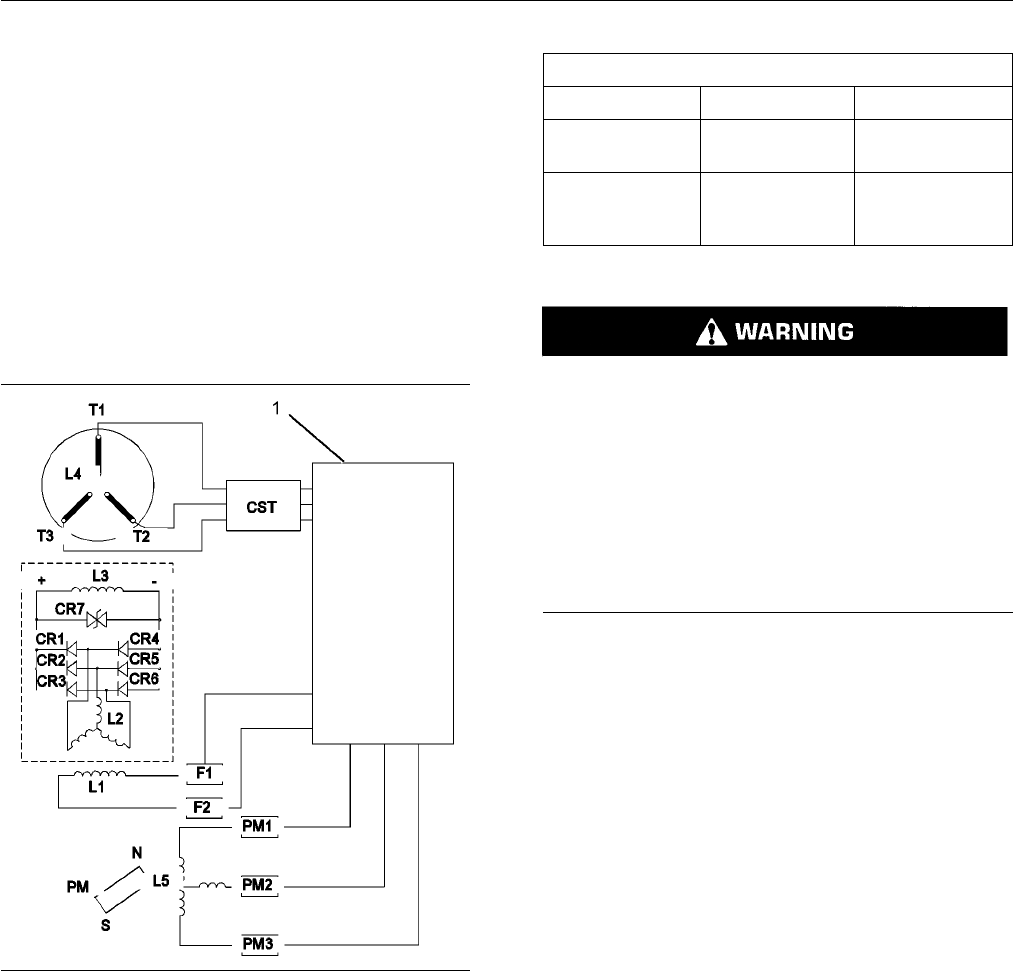
g01445
763
Illustration 78
PMPE generator wiring diagram
(1) Volt
age regulator and/or related com ponents
(CR1) Di
ode
(CR2) Di
ode
(CR3) Di
ode
(CR4) Di
ode
(CR5) Dio
de
(CR6) Dio
de
(CR7) Var
istor
(L1) Exci
ter field (stator)
(L2) Exci
ter a rmature (rot o r)
(L3) M ain fi
eld (rotor)
(L4) Main a
rmature (stator)
(L5) Pilot
exciter armature
(PM) Perma
nent magnet
(RFA) Rotat
ing field assembly
(CST) Custo
mer supplied transformer
Table 18
Tools Needed
Part Number Part
(1)
Quantity
6V-7070
Digital
Multimeter
1
146-4080
Digital
Multimeter
(RS232)
1
(1)
Only one multimeter is necessary for this test. Either of the
multimeters that are s hown will work.
The high voltage that is produced by an operating
generator set can cause severe injury or death.
Before performing any maintenance or repairs,
ensure that the generator will not start.
Place the engine control switch in the “OFF” posi-
tion. Attach “DO NOT OPERATE” tags to all start-
ing controls. Disconnect the batteries or disable
the starting system. Loc k out all switchgear and
automatic transfer switches that are associated
with the generator.
Measure the resistance of the following windings:
(L1), (L2), (L3), (L4), and (L5). The winding that
is being tested must be disconnected from the
other components before the resistance can be
measured. The following resistance measurements
are approximations. If the measured value is
not near the listed approximation, the winding is
probably damaged. For a more precise resistance
value, consult the Technical Marketing Information
(TMI). Refer to the generator arrangement that is in
question.
Note: The winding temperature affects the
resistance. When the winding temperature increases,
the winding resistance also increases. When
the winding temperature decreases, the winding
resistance also decreases. Therefore, a correct
measurement can be performed only when the
winding is at room temperature.
The following armature windings have very little
resistance: (L2), (L4), and (L5). The resistance of
these windings will measure near 0 ohms. Use a
milliohmmeter to measure the resistance of the
armature windings.
Exciter armature (rotor) – less than 0.1 ohm
Main armature (stator) – less than 0.1 ohm
Pilot exciter armature (L5) – less than 0.1 ohm
Use a multimeter in order to measure the resistance
of field windings (L1) and (L3).
Contents Summary of C27 and C32 Generator Sets Operation and Maintenance Manual
- Page 1SEBU8088-06 September 2008 Operation and Maintenance Manual C27 and C32 Generator Sets DWB1-Up (Generator Set) SXC1-Up (Generator Set) WDR1-Up (Generator Set) SAFETY.CAT.COM
- Page 2i01658146 Important Safety Information Most accidents that involve product operation, maintenance and repair are caused by failure to observe basic safety rules or precautions. An accident can often be avoided by recognizing potentially hazardous situations before an accident occurs. A person must b
- Page 3SEBU8088-06 3 Table of Contents Table of Contents Maintenance Interval Schedule (Standby) ............ 73 Maintenance Interval Schedule (Standard) .......... 75 Foreword ................................................................. 4 Reference Information Section Safety Section Engine Ratings ..
- Page 44 SEBU8088-06 Foreword Foreword Use fuel consumption or service hours to determine intervals. Calendar intervals shown (daily, annually, etc.) may be used instead of service meter intervals Literature Information if they provide more convenient schedules and approximate the indicated service meter r
- Page 5SEBU8088-06 5 Foreword California Proposition 65 Warning Diesel engine exhaust and some of its constituents are known to the State of California to cause cancer, birth defects, and other reproductive harm. Battery posts, terminals and related accessories contain lead and lead compounds. Wash hands a
- Page 66 SEBU8088-06 Safety Section Safety Messages Safety Section i02879636 Safety Messages SMCS Code: 1000; 7405 g01433816 Illustration 1 C27 Generator Set right side view
- Page 7SEBU8088-06 7 Safety Section Safety Messages g01433804 Illustration 2 C27 Generator Set left side view
- Page 88 SEBU8088-06 Safety Section Safety Messages g01433818 Illustration 3 C32 Generator Set right side view
- Page 9SEBU8088-06 9 Safety Section Safety Messages g01433805 Illustration 4 C32 Generator Set left side view
- Page 1010 SEBU8088-06 Safety Section Safety Messages Universal Warning (1) Hot Surface (3) The universal safety message is located on each These safety messages are located on each side side of the generator enclosure and on each side of of the radiator and on each side of the barrel of the the terminal bo
- Page 11SEBU8088-06 11 Safety Section Safety Messages Lifting the Genset (4) Hot Fluid Under Pressure (5) This safety message for lifting the genset is located The safety message for hot fluid under pressure is on right, left, and rear panels of the generator located on top of the radiator near the radiator
- Page 1212 SEBU8088-06 Safety Section General Hazard Information i02574315 General Hazard Information SMCS Code: 1000; 4450; 7405 g00702020 Illustration 6 • Wear a hard hat, protective glasses, and other protective equipment, as required. g00104545 Illustration 5 • When work is performed around an engine th
- Page 13SEBU8088-06 13 Safety Section General Hazard Information Pressurized Air and Water Asbestos Information Pressurized air and/or water can cause debris and/or hot water to be blown out. This could result in personal injury. When pressurized air and/or pressurized water is used for cleaning, wear prote
- Page 1414 SEBU8088-06 Safety Section Burn Prevention • Comply with applicable rules and regulations i01480768 for the work place. In the United States, use Occupational Safety and Health Administration Burn Prevention (OSHA) requirements. These OSHA requirements can be found in “29 CFR 1910.1001”. SMCS Cod
- Page 15SEBU8088-06 15 Safety Section Fire Prevention and Explosion Prevention i01496776 Exhaust shields (if equipped) protect hot exhaust components from oil or fuel spray in case of a line, Fire Prevention and Explosion a tube, or a seal failure. Exhaust shields must be Prevention installed correctly. SMC
- Page 1616 SEBU8088-06 Safety Section Fire Prevention and Explosion Prevention Use caution when you are refueling an engine. Do Use ether in well ventilated areas. Do not smoke not smoke while you are refueling an engine. Do not while you are replacing an ether cylinder or while you refuel an engine near op
- Page 17SEBU8088-06 17 Safety Section Crushing Prevention and Cutting Prevention i01359666 i01805780 Crushing Prevention and Before Starting Engine Cutting Prevention SMCS Code: 1000 SMCS Code: 1000; 4450; 7405 NOTICE Support the component properly when work beneath For initial start-up of a new or rebuilt
- Page 1818 SEBU8088-06 Safety Section Engine Stopping If there is a possibility that unburned gas remains in i02106213 the exhaust system, refer to the purge procedure in this Operation and Maintenance Manual, “Engine Electrical System Starting” topic in the Operation Section. SMCS Code: 1000; 1400 Start th
- Page 19SEBU8088-06 19 Safety Section Generator Isolating for Maintenance i01593543 9. Determine that the generator is in a de-energized condition. Add ground straps to the conductors Generator Isolating for or terminals. During the entire work period, these Maintenance ground straps must remain connected t
- Page 2020 SEBU8088-06 Product Information Section Model Views and Specifications Product Information Section Model Views and Specifications i02455395 Model View Illustrations SMCS Code: 1000; 4450 The following model views show typical features of the generator sets that are supported in this manual. Due t
- Page 21SEBU8088-06 21 Product Information Section Model Views and Specifications g01225432 Illustration 14 Typical example of a C27 generator set (1) Emergency stop button (8) Oil filler (15) Oil filter (2) Control panel (9) Fuel filter (16) Radiator cap (3) Air cleaner (10) Package lifting eye (17) Engine
- Page 2222 SEBU8088-06 Product Information Section Model Views and Specifications g01185614 Illustration 15 Typical example of a C32 generator set (1) Control panel (6) Oil filler (11) Water separator (2) Air cleaner (7) Terminal strips (12) Engine lifting eye (3) Oil level gauge (8) Fuel priming pump (13)
- Page 23SEBU8088-06 23 Product Information Section Model Views and Specifications • Cold start strategy Engine Specifications • Automatic air/fuel ratio control Note: The front end of the engine is opposite the flywheel end of the engine. The left and the right sides • Integrated ether start of the engine a
- Page 2424 SEBU8088-06 Product Information Section Model Views and Specifications The generator set packages can be utilized for prime power generation or standby power generation. The generator set packages can be used in land-based applications or marine applications. SR4B generators are utilized in three
- Page 25SEBU8088-06 25 Product Information Section Product Identification Information Product Identification Information i02456200 Plate Locations and Film Locations SMCS Code: 1000; 4450 Caterpillar generator sets are identified by serial numbers and by arrangement numbers. These numbers are shown on the e
- Page 2626 SEBU8088-06 Product Information Section Product Identification Information Engine Serial Number Plate (3) The engine serial number plate is located on the left side of the engine block. Engine serial number _____________________________________ Engine model _______________________________________
- Page 27SEBU8088-06 27 Product Information Section Product Identification Information g00776690 Illustration 19 i01757910 The packaging arrangement may also be called a pricing arrangement or a customer arrangement. This Reference Information is the total package with attachments and options that are not in
- Page 2828 SEBU8088-06 Product Information Section Product Identification Information Engine Serial Number ____________________________________ The leads are numbered clockwise from the top and from the outside inward. The diagrams that Engine Arrangement Number ___________________________ are contained in
- Page 29SEBU8088-06 29 Product Information Section Product Identification Information 12 Lead Delta Configuration Diagrams 6 Lead g00661863 Illustration 21 12 Lead Wye Configuration - High Voltage g00669319 Illustration 23 Terminals T10, T11 and T12 become neutral connection when the terminals are tied toge
- Page 3030 SEBU8088-06 Product Information Section Product Identification Information Grounding the Frame In applications in which definite measures are taken in order to prevent grounds to the load leads, an In any generator set installation, the frame of the ungrounded neutral can be used. Be sure to chec
- Page 31SEBU8088-06 31 Product Information Section Product Identification Information Wye Configuration Diagrams 6 Lead Generators g00637320 Illustration 27 Typical Parallel Wye Configuration (60 Hz, 12 Lead) g00626053 This is a typical high voltage connection. Illustration 25 Typical Wye Configuration (60
- Page 3232 SEBU8088-06 Product Information Section Product Identification Information 12 Lead Generators Do not exceed the nameplate current rating for any one phase. Wye Configuration Diagrams 6 Lead Generators g00626130 Illustration 29 Typical Delta Configuration (60 Hz, 12 Lead) Single-Phase Current From
- Page 33SEBU8088-06 33 Product Information Section Product Identification Information Delta Configuration Diagrams 6 Lead Generators g00626135 Illustration 32 Single-Phase Voltage Diagram with 6 Lead Delta Configuration 12 Lead Generators g00626136 Illustration 33 Single-Phase Voltage Diagram with 12 Lead D
- Page 3434 SEBU8088-06 Operation Section Lifting and Storage Operation Section Lifting the Entire Package Do NOT use the engine lifting eyes or the generator lifting eyes to lift the entire package. Lifting and Storage Lifting points (3) have been provided on the base rails of the generator set for lifting
- Page 35SEBU8088-06 35 Operation Section Lifting and Storage i02068367 Product Storage SMCS Code: 7002 If the engine will not be started for several weeks, the lubricating oil will drain from the cylinder walls and from the piston rings. Rust can form on the cylinder liner surface. Rust on the cylinder line
- Page 3636 SEBU8088-06 Operation Section Installation Installation Storage Short Time Storage i01856938 Generator Set Installation If the generator is not installed immediately, store the generator in a clean area. This area should also SMCS Code: 7002 have the following conditions: low humidity, stable hum
- Page 37SEBU8088-06 37 Operation Section Installation • Well ventilated Protective Devices • Easily accessible for inspection and maintenance The output to the load of the generator should always be protected with an overload protection device such Do not obstruct air inlet openings. Do not obstruct as a ci
- Page 3838 SEBU8088-06 Operation Section Features and Controls Features and Controls i02363871 Electronic Modular Control Panel II+ with Paralleling (EMCP II+P) (If Equipped) SMCS Code: 4490 g00639524 Illustration 35 Electronic Modular Control Panel II+ With Paralleling (EMCP II+P) (1) Generator set control
- Page 39SEBU8088-06 39 Operation Section Features and Controls The main control panel may or may not contain all Pump Run Switch (8) – The pump run switch is of the components which are shown in Illustration optional. This momentary push button switch is 35. Some components are optional. The optional used w
- Page 4040 SEBU8088-06 Operation Section Features and Controls Synchronization Mode Switch (14) – The Breaker Open Pushbutton/Indicator (15) – When synchronization mode switch (14) is manually the generator is being taken off-line manually, the operated. The switch has four positions: the AUTO breaker open
- Page 41SEBU8088-06 41 Operation Section Features and Controls In the very basic operating conditions, the GSC+ • Power Down: The EMCP II+P system is designed receives a signal to run the generator set. The GSC+ to remove power from the GSC+ when the engine turns on the engine’s fuel and starter. When the c
- Page 4242 SEBU8088-06 Operation Section Features and Controls • fault shutdown indicator (25) When the control panel is not in a paralleling mode, the same three spare fault indicators (28) can be • spare fault indicators (28) programmed by the customer. The three spare faults can be programmed to show coo
- Page 43SEBU8088-06 43 Operation Section Features and Controls High Water Temperature – The engine coolant Display temperature rises above the setpoint for high water temperature shutdown that is programmed into the GSC+. When the high water temperature fault occurs, the high water temperature indicator FLA
- Page 4444 SEBU8088-06 Operation Section Features and Controls Note: When total current increases above “9999A”, • Power factor (average) the GSC+ will show current in “kA” units. • Power factor phase A • Line to neutral voltage for all three phases at once • Power factor phase B Upper display (29) is also
- Page 45SEBU8088-06 45 Operation Section Features and Controls The relay status indicators are on the bottom of the Alarm Codes Key (30) – If fault alarm indicator (26) lower display (31). When a GSC+ relay is activated, is FLASHING, pressing this key causes the upper the corresponding indicator (K1, K2, et
- Page 4646 SEBU8088-06 Operation Section Features and Controls Alarm Module Custom Alarm Module g00635769 g00635777 Illustration 41 Illustration 42 The Location of the Alarm Module (ALM) on the EMCP II+P The Location of the Custom Alarm Module (CAM) on the EMCP Control Panel II+P Control Panel The alarm mod
- Page 47SEBU8088-06 47 Operation Section Features and Controls i02443021 Electronic Modular Control Panel 3 (EMCP 3) SMCS Code: 4490 Electronic Control Module (Generator Set) g01045431 Illustration 43 (1) Display screen (7) Lamp test key (13) Right key (2) AC overview key (8) Run key (14) Enter key (3) Engi
- Page 4848 SEBU8088-06 Operation Section Features and Controls RUN Key (8) – Pressing the “RUN” key will start Left Key (16) – The “LEFT” key is used during the engine. setpoint adjustment. The “LEFT” key is used to select the digit that is edited during the entry of numeric AUTO Key (9) – Pressing the “AUT
- Page 49SEBU8088-06 49 Operation Section Features and Controls Digital Input 2 – Digital Input 2 is used for remotely • Engine oil level starting and stopping the generator set. This input should be wired to GROUND through a switch that • Fuel level can be initiated remotely. The input can be set to activat
- Page 5050 SEBU8088-06 Operation Section Features and Controls Note: Your application may not have all of these features. Pump Stop Switch (1) – The pump stop switch is optional. The pump stop switch is used to manually stop the fuel transfer pump. Fully depress the switch in order to latch the switch. The
- Page 51SEBU8088-06 51 Operation Section Features and Controls Annunciator Module To acknowledge the shutdown and alarm conditions or to silence the horn, press the “Alarm Acknowledge” button that is located near the middle of the annunciator. To test the LED indicators or to test the horn when the data lin
- Page 5252 SEBU8088-06 Operation Section Engine Starting Engine Starting • Do not start the engine or move any of the controls if there is a “DO NOT OPERATE” warning tag or similar warning tag attached to the start switch or i02048636 to the controls. Before Starting Engine • Ensure that the areas around th
- Page 53SEBU8088-06 53 Operation Section Engine Starting Startability will be improved at temperatures below 10°C (50°F) from the use of a cylinder block coolant NOTICE heater or from other means that are used to heat Oil pressure should rise within 15 seconds after the the crankcase oil. Some engine applic
- Page 5454 SEBU8088-06 Operation Section Engine Starting i01934760 5. Immediately after the stalled engine is started, disconnect the jump start cables in reverse order. Starting with Jump Start Cables Note: If there is a problem with the alternator or the battery charger, the engine will not continue to ru
- Page 55SEBU8088-06 55 Operation Section Engine Operation Engine Operation i01136207 Fuel Conservation Practices i01646252 SMCS Code: 1000; 1250 Engine Operation The efficiency of the engine can affect the fuel SMCS Code: 1000 economy. Caterpillar’s design and technology in manufacturing provides maximum fu
- Page 5656 SEBU8088-06 Operation Section Engine Stopping Engine Stopping i02443872 Manual Stop Procedure i02237582 SMCS Code: 1000; 7418 Emergency Stopping Note: Individual applications will have different SMCS Code: 1000; 7418 control systems. Ensure that the shutoff procedures are understood. Use the foll
- Page 57SEBU8088-06 57 Operation Section Cold Weather Operation Cold Weather Operation When No. 2 diesel fuel is used the following components provide a means of minimizing problems in cold weather: i02237624 • Starting aids Fuel and the Effect from Cold Weather • Engine oil pan heaters SMCS Code: 1000; 125
- Page 5858 SEBU8088-06 Operation Section Cold Weather Operation Fuel Filters Note: Heat exchanger type fuel heaters should have a bypass provision in order to prevent overheating of NOTICE the fuel in warm weather operation. Do not fill the fuel filters with fuel before installing them. The fuel would not b
- Page 59SEBU8088-06 59 Operation Section Generator Operation Generator Operation i02443880 Generator Operation SMCS Code: 4450 Loading of the Generator When a generator is installed or reconnected, be sure that the total current in one phase does not exceed the nameplate rating. Each phase should carry the
- Page 6060 SEBU8088-06 Operation Section Generator Operation If derating for the block load is required, refer to ISO Permanent Magnet Pilot Excited 3046 Standards or SAE J1349 Standards. Also, Generators reference Engine Data Sheet, LEKX4066, “Loading Transient Response” and Engine Data Sheet, Permanent Ma
- Page 61SEBU8088-06 61 Operation Section Generator Operation Generator Options Units that operate in parallel must have the same phase rotation. There are two methods that may Space Heaters be used in order to determine if the incoming unit and the unit that is on-line have the same phase Most of the SR4B g
- Page 6262 SEBU8088-06 Operation Section Generator Operation • Both generators have the same phase c. Apply the available load. The setting is correct rotation when the lights blink in unison. The only if a reactive load is available. Equalize the first condition of “Initial Start-Up” has been Kilowatts or
- Page 63SEBU8088-06 63 Operation Section Generator Operation Load Division and Speed Droop (If The circulating current may be as high as 25 percent of rated amperes with cold generator sets. Equipped) Such current may not even be considered harmful. The total generator current should not exceed the Once two
- Page 6464 SEBU8088-06 Operation Section Voltage Regulators Voltage Regulators The Caterpillar Digital Voltage Regulator (CDVR) is a microprocessor based voltage regulator. Control power for the CDVR is supplied from an external i02303476 source of 24 VDC. The power stage of the CDVR can be supplied from a
- Page 65SEBU8088-06 65 Operation Section Voltage Regulators i01809359 Voltage Regulator Options SMCS Code: 4467 Manual Voltage Control A manual voltage control is available as an option on Caterpillar generator sets. Various specifications and certifications require manual voltage control of the generator i
- Page 6666 SEBU8088-06 Maintenance Section Refill Capacities Maintenance Section Table 2 Engine Oil Viscosities for Ambient Temperatures Ambient Temperature Refill Capacities Viscosity Grade Minimum Maximum SAE 0W-20 −40 °C (−40 °F) 10 °C (50 °F) i02874979 SAE 0W-30 −40 °C (−40 °F) 30 °C (86 °F) Refill Capa
- Page 67SEBU8088-06 67 Maintenance Section Refill Capacities Cooling System Table 4 Coolant Service Life Coolant Recommendations Coolant Type Service Life (1) NOTICE Cat ELC Six Years Do not use a commercial coolant/antifreeze that only Cat DEAC Three Years meets the ASTM “D3306” specification. This type of
- Page 6868 SEBU8088-06 Maintenance Section Maintenance Recommendations Maintenance • knowledgeable visual examination of the equipment Recommendations • the application of electrical tests i01179728 Never perform a test over the rated potential. These General Maintenance tests can damage insulation that is
- Page 69SEBU8088-06 69 Maintenance Section Maintenance Recommendations • The internal pressures of the high pressure fuel 1. Stop the engine. Turn the switched power to the lines are higher than other types of fuel system. OFF position. Before any service or repair is performed on the 2. Disconnect the nega
- Page 7070 SEBU8088-06 Maintenance Section Maintenance Recommendations Note: If electrical/electronic components are used as a ground for the welder, or electrical/electronic components are located between the welder ground and the weld, current flow from the welder could severely damage the component. 5. P
- Page 71SEBU8088-06 71 Maintenance Section Maintenance Recommendations (Table 6, contd) GENERATOR START-UP CHECKLIST No Load “T1” to “T2” AC “T1” to “T3” AC “T2” to “T3” AC “11” to “12” AC “11” to “13” AC “12” to “13” AC Full Load “T1” to “T2” AC “T1” to “T3” AC “T2” to “T3” AC “11” to “12” AC “11” to “13”
- Page 7272 SEBU8088-06 Maintenance Section Maintenance Recommendations Table 7 GENERATOR START-UP CHECKLIST (CONT.) ELECTRICAL Yes No Comments Unit properly grounded Check diodes Over current protection Over voltage protection Check for loose wiring Adjust voltage Adjust frequency MECHANICAL Data Comments B
- Page 73SEBU8088-06 73 Maintenance Section Maintenance Interval Schedule i03257578 Space Heater - Check ......................................... 116 Standby Generator Set Maintenance Maintenance Interval Schedule Recommendations ............................................. 118 (Standby) Stator Winding Tem
- Page 7474 SEBU8088-06 Maintenance Section Maintenance Interval Schedule Every 12 000 Service Hours or 6 Years Cooling System Coolant (ELC) - Change ............. 87
- Page 75SEBU8088-06 75 Maintenance Section Maintenance Interval Schedule i03257575 Generator - Inspect ............................................. 104 Space Heater - Check ......................................... 116 Maintenance Interval Schedule Stator Winding Temperature - Measure/Record .. 120 (Standa
- Page 7676 SEBU8088-06 Maintenance Section Maintenance Interval Schedule Every 19 000 L (5000 US gal) of Fuel or 250 Service Hours Engine Air Cleaner Element (Dual Element) - Clean/Replace .................................................... 93 Engine Oil Sample - Obtain .................................. 9
- Page 77SEBU8088-06 77 Maintenance Section Air Inlet Filter - Check i02574676 1. Turn the key start switch to the OFF position. Remove the key and all electrical loads. Air Inlet Filter - Check 2. Turn OFF the battery charger. Disconnect the SMCS Code: 1051-535 charger. Monitor the connector contacts of the
- Page 7878 SEBU8088-06 Maintenance Section Battery Charger - Check i01039758 Perform one of the following procedures if the battery shows symptoms of overcharging: Battery Charger - Check • Reduce the rate of charging by a significant SMCS Code: 1401-535 amount. Complete the charging at the reduced rate. Ch
- Page 79SEBU8088-06 79 Maintenance Section Battery or Battery Cable - Disconnect 1. Switch the engine to the OFF position. Turn the ignition switch (if equipped) to the OFF position and remove the key and all electrical loads. All lead-acid batteries contain sulfuric acid which can burn the skin and clothin
- Page 8080 SEBU8088-06 Maintenance Section Bearing - Inspect 6. Operate the generator for one hour. This will allow 3. All ball bearings should be cleaned. The cavity the grease to expand. The expanding grease will of the bracket should be repacked with 2S-3230 force the excess grease from the cavity. When
- Page 81SEBU8088-06 81 Maintenance Section Bearing - Inspect Table 9 Bearing Bearing Part Generator Bearing Bore Bearing Bearing Rotor Shaft Outside Inside Number Frame in Bracket Shield Cavity Diameter Diameter Diameter Size mm (inch) (Type) Grease mm (inch) mm (inch) mm (inch) mL (oz) 100.000 mm 45.000 mm
- Page 8282 SEBU8088-06 Maintenance Section Bearing - Inspect (Table 9, contd) Bearing Bearing Part Generator Bearing Bore Bearing Bearing Rotor Shaft Outside Inside Number Frame in Bracket Shield Cavity Diameter Diameter Diameter Size mm (inch) (Type) Grease mm (inch) mm (inch) mm (inch) mL (oz) 225.000 mm
- Page 83SEBU8088-06 83 Maintenance Section Bearing Temperature - Measure/Record (Table 9, contd) Bearing Bearing Part Generator Bearing Bore Bearing Bearing Rotor Shaft Outside Inside Number Frame in Bracket Shield Cavity Diameter Diameter Diameter Size mm (inch) (Type) Grease mm (inch) mm (inch) mm (inch)
- Page 8484 SEBU8088-06 Maintenance Section Control Panel - Inspect Alternator Belt Adjustment Electronic Modular Control Panel 3 (EMCP 3) g01184041 Illustration 54 The Lamp Test button is located on the top right side of the electronic control module. Press and hold the Lamp Test button in order to test all
- Page 85SEBU8088-06 85 Maintenance Section Cooling System Coolant (DEAC) - Change It is possible to test the LED indicators and the horn 2. Open the cooling system drain valve (if equipped). when the data link is connected and when the data If the cooling system is not equipped with a drain link is not conn
- Page 8686 SEBU8088-06 Maintenance Section Cooling System Coolant (DEAC) - Change 5. Stop the engine and allow the engine to cool. 5. Stop the engine and allow the engine to cool. Loosen the cooling system filler cap slowly Loosen the cooling system filler cap slowly in order to relieve any pressure. Remove
- Page 87SEBU8088-06 87 Maintenance Section Cooling System Coolant (ELC) - Change i02056152 For information regarding the disposal and the recycling of used coolant, consult your Caterpillar Cooling System Coolant (ELC) dealer or consult Caterpillar Dealer Service Tool - Change Group: SMCS Code: 1350-044-NL
- Page 8888 SEBU8088-06 Maintenance Section Cooling System Coolant Extender (ELC) - Add 3. Check the coolant level. Maintain the coolant level within 13 mm (0.5 inch) below the bottom of the pipe for filling. Maintain the coolant level within Personal injury can result from hot coolant, steam 13 mm (0.5 inch
- Page 89SEBU8088-06 89 Maintenance Section Cooling System Coolant Level - Check i01197583 3. Clean the cooling system filler cap and check the condition of the filler cap gaskets. Replace the Cooling System Coolant Level cooling system filler cap if the filler cap gaskets are - Check damaged. Reinstall the
- Page 9090 SEBU8088-06 Maintenance Section Cooling System Coolant Sample (Level 2) - Obtain Obtain the sample of the coolant as close as possible Submit the sample for Level 2 analysis. to the recommended sampling interval. In order to receive the full effect of S·O·S analysis, you For additional informatio
- Page 91SEBU8088-06 91 Maintenance Section Cooling System Supplemental Coolant Additive (SCA) - Test/Add Cooling Systems that Use Cooling Systems that Use Water Conventional Coolant and SCA This maintenance procedure is required for Test the Concentration of the SCA conventional coolants such as DEAC.This m
- Page 9292 SEBU8088-06 Maintenance Section Cooling System Water Temperature Regulator - Replace i02623972 Note: If only the water temperature regulators are replaced, drain the coolant from the cooling system to Cooling System Water a level that is below the water temperature regulator Temperature Regulator
- Page 93SEBU8088-06 93 Maintenance Section Electrical Connections - Check i01217164 • Ease of maintenance Electrical Connections - Check Note: For more information on cleaning and drying electric generators, refer to Special Instruction, SMCS Code: 4459-535 SEHS9124, “Cleaning and Drying of Electric Set Gen
- Page 9494 SEBU8088-06 Maintenance Section Engine Air Cleaner Service Indicator - Inspect The service indicator may be mounted on the air cleaner housing or in a remote location. g00736431 Illustration 58 (1) Cover (2) Primary air cleaner element g00103777 Illustration 59 (3) Secondary air cleaner element (
- Page 95SEBU8088-06 95 Maintenance Section Engine Crankcase Breather - Clean i02327200 i01786814 Engine Crankcase Breather - Engine Mounts - Check Clean SMCS Code: 1152-535 SMCS Code: 1317-070 Misalignment of the engine and the driven equipment will cause extensive damage. Excessive vibration can lead to mi
- Page 9696 SEBU8088-06 Maintenance Section Engine Oil Sample - Obtain 1. Maintain the oil level between “ADD” mark (Y) and Obtain the Sample and the Analysis “FULL” mark (X) on the oil level gauge. Do not fill the crankcase above “FULL” mark (X). NOTICE Hot oil and hot components can cause personal Engine d
- Page 97SEBU8088-06 97 Maintenance Section Engine Oil and Filter - Change For instructions, see Special Publication, PEHP6001, Replace the Oil Filter “How To Take A Good Oil Sample”. Consult your Caterpillar dealer for complete information and NOTICE assistance in establishing an S·O·S program for your Cate
- Page 9898 SEBU8088-06 Maintenance Section Engine Protective Devices - Check A calibration check of the engine protective devices NOTICE will ensure that the alarms and shutoffs activate Do not fill the oil filters with oil before installing them. at the setpoints. Ensure that the engine protective This oil
- Page 99SEBU8088-06 99 Maintenance Section Fan Drive Bearing - Lubricate Lubricate the grease fitting that is on the fan drive bearing with High Speed Ball Bearing Grease or the equivalent. Ensure that the engine can not be started while this maintenance is being performed. To help pre- Inspect the fan driv
- Page 100100 SEBU8088-06 Maintenance Section Fuel System - Prime NOTICE Do not allow dirt to enter the fuel system. Thoroughly clean the area around a fuel system component that will be disconnected. Fit a suitable cover over any dis- connected fuel system components. g01275944 Illustration 65 The secondary
- Page 101SEBU8088-06 101 Maintenance Section Fuel System Primary Filter (Water Separator) Element - Replace i02049797 NOTICE Fuel System Primary Filter Use a suitable container to catch any fuel that might (Water Separator) Element - spill. Clean up any spilled fuel immediately. Replace 5. Remove the fuel fi
- Page 102102 SEBU8088-06 Maintenance Section Fuel System Primary Filter/Water Separator - Drain i01463757 Fuel System Primary Filter/Water Separator - Drain SMCS Code: 1260-543; 1263-543 g01162207 Illustration 68 (1) Fuel supply connections (2) Fuel filter NOTICE Do not allow dirt to enter the fuel system. T
- Page 103SEBU8088-06 103 Maintenance Section Fuel Tank Water and Sediment - Drain 5. Install the new fuel filter. Spin the fuel filter onto Fill the fuel tank after operating the engine in the fuel filter base until the gasket contacts the order to drive out moist air. This will help prevent base. Use the ro
- Page 104104 SEBU8088-06 Maintenance Section Generator - Inspect Drying Methods Proper maintenance of electrical equipment requires periodic visual examination of the generator and The following methods can be used for drying a periodic visual examination of the windings. Proper generator: maintenance of ele
- Page 105SEBU8088-06 105 Maintenance Section Generator Load - Check A small nonconductive tube may need to be i01473721 connected to the vacuum cleaner. This will allow the vacuum cleaner to clean the surfaces that are not Generator Load - Check exposed. After most of the dust has been removed, a small brush
- Page 106106 SEBU8088-06 Maintenance Section Generator Set - Test i01473730 • The phase voltages change relative to engine speed. Generator Set - Test The generator set functional test consists of the SMCS Code: 4450-081 following steps: 1. Stop the generator. Connect the potential transformer’s high voltage
- Page 107SEBU8088-06 107 Maintenance Section Generator Set Vibration - Inspect i02211917 Visually inspect all heat shields for signs of wear. Some unacceptable signs of wear are listed below. Generator Set Vibration - Inspect • Outer covering that is chafed or cracked SMCS Code: 4450-040-VI • Outer covering
- Page 108108 SEBU8088-06 Maintenance Section Insulation - Test Due to extreme temperature changes, the hose will 10. Start the engine. Inspect the cooling system for heat set. Heat setting causes hose clamps to loosen. leaks. This can result in leaks. A constant torque hose clamp will help to prevent loose h
- Page 109SEBU8088-06 109 Maintenance Section Insulation - Test • The generator set is installed in an enclosed area. 8. Connect the insulation tester’s BLACK lead to This area needs to be low in humidity and this area “T0”. needs to have steady temperatures. Test every twelve months (minimum). 9. For units t
- Page 110110 SEBU8088-06 Maintenance Section Insulation - Test g00633226 Illustration 69
- Page 111SEBU8088-06 111 Maintenance Section Jacket Water Heater - Check i01917546 The oil consumption rate (brake specific oil consumption) is measured in grams per kW/h (lb per Jacket Water Heater - Check bhp). The brake specific oil consumption (BSOC) (Standby Generator Sets (If depends on the engine load
- Page 112112 SEBU8088-06 Maintenance Section Overhaul Considerations Use the actual records of fuel consumption, when Note: Overhaul programs vary according to the possible. If the actual records are not available, use engine application and according to the dealer that the following procedure in order to es
- Page 113SEBU8088-06 113 Maintenance Section Overhaul Considerations Reduced engine efficiency and increased fuel • Camshaft bearings consumption translates into higher operating costs. Therefore, Caterpillar Inc. recommends repairing • Camshaft followers out-of-spec parts or replacing out-of-spec parts. Cat
- Page 114114 SEBU8088-06 Maintenance Section Power Factor - Check 5. Wash the oil cooler core and the aftercooler core • Identification of contaminants with hot, soapy water. Rinse the oil cooler core and the aftercooler core thoroughly with clean water. • Identification of built up impurities (corrosion and
- Page 115SEBU8088-06 115 Maintenance Section Rotating Rectifier - Check Testing a Three-Diode Rectifier Block Personal injury can result from air pressure. Personal injury can result without following prop- er procedure. When using pressure air, wear a pro- tective face shield and protective clothing. The ma
- Page 116116 SEBU8088-06 Maintenance Section Space Heater - Check a. Place the red test lead on the negative “-” terminal. Place the black test lead on the following rectifier terminals: “AC1”(3), “AC2”(4), and “AC3”(5). All readings on the meter should be between 0.4 and 1.0. b. Place the black test lead on
- Page 117SEBU8088-06 117 Maintenance Section Speed Sensor - Clean/Inspect g01184155 Illustration 75 1. Remove the sensor. Inspect the condition of the end of the magnet. Look for signs of wear and contaminants. 2. Clean any debris from the face of the magnet. 3. Check the tension of the sliphead. Gently exte
- Page 118118 SEBU8088-06 Maintenance Section Standby Generator Set Maintenance Recommendations i03108463 Maintenance and Repair Standby Generator The maintenance that is recommended for Every Set Maintenance Week can be performed by an authorized operator. The maintenance that is recommended for the Recommen
- Page 119SEBU8088-06 119 Maintenance Section Starting Motor - Inspect i02618737 The starting motor pinion and the flywheel ring gear must be in good condition in order for the engine Starting Motor - Inspect to start properly. The engine will not start if the (If equipped) starting motor pinion does not enga
- Page 120120 SEBU8088-06 Maintenance Section Stator Winding Temperature - Measure/Record i03086301 NOTICE Stator Winding Temperature - Turbocharger bearing failures can cause large quan- Measure/Record tities of oil to enter the air inlet and exhaust systems. Loss of engine lubricant can result in serious en
- Page 121SEBU8088-06 121 Maintenance Section Varistor - Test 3. Check the compressor wheel for cleanliness. i01494879 If only the blade side of the wheel is dirty, dirt and/or moisture is passing through the air filtering Varistor - Test system. If oil is found only on the back side of the wheel, there is a
- Page 122122 SEBU8088-06 Maintenance Section Voltage and Frequency - Check Test Light i02591373 Walk-Around Inspection SMCS Code: 1000-040 Personal injury or death can result from improper troubleshooting and repair procedures. The following troubleshooting and repair proce- dures should only be performed by
- Page 123SEBU8088-06 123 Maintenance Section Water Pump - Inspect Excessive coolant leakage may indicate the need A visual inspection should be initially directed at to replace the water pump seal. For the removal of the areas that are most prone to damage and water pump and the installation of water pump an
- Page 124124 SEBU8088-06 Maintenance Section Winding - Test Visually inspect the water pump for leaks. If any Table 18 leaking is observed, replace the water pump seal Tools Needed or the water pump assembly. Refer to the Service Manual for the disassembly and assembly procedure. Part Number Part(1) Quantity
- Page 125SEBU8088-06 125 Maintenance Section Winding - Test Exciter field (stator) (L1) – approximately 3.0 ohms to 6.0 ohms Main field (rotor) (L3) – approximately 1.25 ohms to 2.0 ohms Note: There should be no continuity between any winding and ground. There should be no continuity between any winding and
- Page 126126 SEBU8088-06 Reference Information Section Engine Ratings Reference Information i01250210 Section Engine Rating Definitions SMCS Code: 1000 Engine Ratings The ratings must be reduced in order to accommodate changes in the altitude. The ratings must be reduced according to the data for derating th
- Page 127SEBU8088-06 127 Reference Information Section Engine Ratings Prime + 10% (Standby applications for a power Curtailable (Connected to a utility with a supply from a reliable utility) – This rating allows a Continuous base rating for load factors) – This load that varies up to the Prime rating. An add
- Page 128128 SEBU8088-06 Reference Information Section Customer Service Customer Service Latin America, Mexico, Carribean Caterpillar Americas Co. 701 Waterford Way, Suite 200 i03201484 Miami, FL 33126-4670 USA Customer Assistance Phone: 305-476-6800 Fax: 305-476-6801 SMCS Code: 1000; 4450 Europe, Africa, an
- Page 129SEBU8088-06 129 Reference Information Section Customer Service i01028392 Ordering Replacement Parts SMCS Code: 4450; 7567 When replacement parts are required for this product Caterpillar recommends using Caterpillar replacement parts or parts with equivalent spec- ifications including, but not limit
- Page 130130 SEBU8088-06 Reference Information Section Reference Materials Reference Materials • Maintenance log i00912149 Maintenance Records SMCS Code: 1000; 4450 Caterpillar Inc. recommends the retention of accurate maintenance records. Accurate maintenance records can be used for the following purposes:
- Page 131SEBU8088-06 131 Reference Information Section Reference Materials i01176304 Maintenance Log SMCS Code: 1000; 4450 Table 19 Engine Model Customer Identifier Serial Number Arrangement Number Service Quantity Service Item Date Authorization Hours Of Fuel
- Page 132132 SEBU8088-06 Reference Information Section Reference Materials i02413905 • Special Publication, SEBU6251, “Caterpillar Commercial Diesel Engine Fluids Reference Material Recommendations” SMCS Code: 1000; 4450 Coolants The following publications can be obtained from any Caterpillar dealer. • Data
- Page 133SEBU8088-06 133 Reference Information Section Reference Materials • Electrical Schematic, RENR9855, “C32 Generator The “American Petroleum Institute Publication No. Set Engines” 1509” can be obtained from the following locations: local technological society, local library, and local • Parts Manual,
- Page 134134 SEBU8088-06 Reference Information Section Reference Materials i00382622 Warranty Information SMCS Code: 1000 Engine Protection Plans Extended Warranties and Service Contracts A wide variety of protection plans are available for Caterpillar Engines. Consult your Caterpillar dealer for detailed in
- Page 135SEBU8088-06 135 Reference Information Section Reference Materials i01207219 Continuity – Continuity provides a path for current flow. Glossary Control – A control is a device that controls another SMCS Code: 4450 device. A control is also a circuit that controls a device. Actuate – Actuation relates
- Page 136136 SEBU8088-06 Reference Information Section Reference Materials Frequency – Frequency is the number of cycles KVAR – Kilovolt Amperes Reactive is abbreviated as that are completed in a one second period. The unit KVAR. KVAR is associated with the reactive power of frequency is the Hertz (Hz). One
- Page 137SEBU8088-06 137 Reference Information Section Reference Materials Phase Winding – A phase winding is a group of Saturable Reactor – A saturable reactor has generator stator coils. Electric power for one phase characteristics that are similar to a valve. As the load of the load is induced in the phas
- Page 138138 SEBU8088-06 Reference Information Section Reference Materials Turn-on – When a device is turned on, the device is activated or the device is started. Varistor – A varistor is a device that loses resistance as voltage increases. Voltage Droop Resistor – A voltage droop resistor is a variable resi
- Page 139SEBU8088-06 139 Index Section Index A Cooling System Supplemental Coolant Additive (SCA) - Test/Add.................................................. 90 After Starting Engine ............................................. 54 Cooling Systems that Use Conventional After Stopping Engine.................
- Page 140140 SEBU8088-06 Index Section Engine Ratings .................................................... 126 Generator Lead Connections ................................ 28 Engine Starting ................................................ 17, 52 Grounding the Frame......................................... 30
- Page 141SEBU8088-06 141 Index Section M Reference Material .............................................. 132 Additional Reference Material.......................... 133 Maintenance Interval Schedule (Standard) ........... 75 Coolants........................................................... 132 Maintenanc
- Page 142142 SEBU8088-06 Index Section Voltage Connections.............................................. 30 Single-Phase Current From a Three-Phase Generator ......................................................... 32 Three-Phase Voltage Connections .................... 30 Voltage Regulator Options.........
- Page 143Product and Dealer Information Note: For product identification plate locations, see the section “Product Identification Information” in the Operation and Maintenance Manual. Delivery Date: Product Information Model: Product Identification Number: Engine Serial Number: Transmission Serial Number: Ge
- Page 144©2008 Caterpillar Cat, Caterpillar, their respective logos, “Caterpillar Yellow” and the Power edge Printed in U.S.A. All Rights Reserved trade dress, as well as corporate and product identity used herein, are trademarks of Caterpillar and may not be used without permission.